Tag Archives: distress inks

No More Christmas Card Guilt – Send A New Years Card

30 Dec

Have you ever been caught out at Christmas, receiving a card from someone you didn’t have on your Christmas card list?  It’s happened to me a few times over the years and boy does it give you a guilt trip (if you’re so inclined – unfortunately  I am!)  So you know the solution right?  Send a New Years card!  This is a fantastic little trick and the great part is you don’t have to make sure it’s going to arrive before New Years like you do with Christmas cards, as long as it get’s there in the first two weeks of the New Year then I think that’s perfectly acceptable.

Photo 30-12-2014 3 37 59 pm

But hang on a second, don’t go rushing to the shops to spend money on New Years cards – make your own!  The recipient will totally forget that you didn’t send them a Christmas card once they have your gorgeous, handmade News Years card in their hot little hands.  The added bonus is it’s a great way to get your mojo going again after the frazzle and stress of Christmas.  If you have little ones be sure to get them in on the act…can’t you just hear your relatives ooohing and ahhhing over their cute hand drawn cards?

Photo 30-12-2014 3 36 33 pm

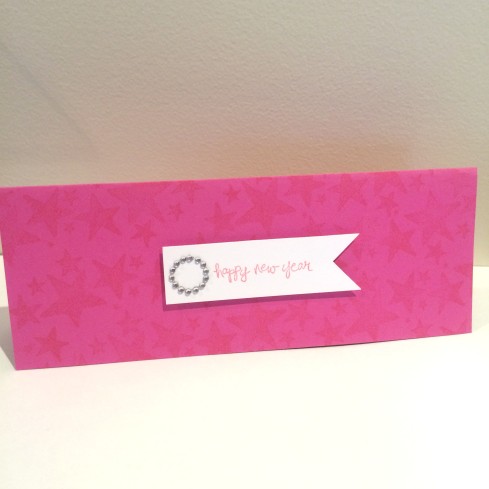
Unfortunately I don’t have any little helpers so the creativity is all down to me.  I’ve made a variety of cards to show you that you don’t really even need any New Year specific stamps, just think of all the wonderful things you associate with it and raid your stamp folders.  Think fancy drinks, sparkly things, clocks, stars, balloons, party hats, flowers, just about anything will do.  If you’ve got a set of numerical stamps even better – you can use them every year.

Photo 30-12-2014 3 35 42 pm

I think nice bright party colour card bases work well and don’t forget that special New Years sparkle, a bit of sticky bling or iridescent heat embossing will add some extra wow.

Photo 30-12-2014 3 36 11 pm


And you don’t have to spend all day (or all week) making your cards.  I’ve kept mine pretty simple as you can see but they are still very effective and with a lovely message inside wishing your friends and family a wonderful 2015 these New Years cards are the perfect solution to a holiday guilt trip.  So spill the beans, who did you forget to send a Christmas card to this year?

Photo 30-12-2014 3 37 33 pm

The Heart Tag Swap

20 Mar

I’ve been having some fun of Swap-bot lately and I wanted to share an art tag I made for a heart theme tag swap for one of the Aussie groups I’m in.

20140227-200009.jpg

I love making tags, they are just the right size that you can let your artist flair loose without being overwhelmed by a big blank canvas or page – which happens a lot to me.  Genius idea using tags, thanks Tim Holtz.  I used distress inks, rub-ons, stamping, pen, paint dabbers, chipboard, crackle paint and glossy accents and I’m so happy with how it turned out.

20140227-200103.jpg

Here’s a close up of the heart chipboard I made.  I inked it with Fired Brick distress ink first then covered it in Rock Candy distress crackle paint.  Once it was thoroughly dry and super crackled I rubbed some Black Soot distress ink over the top and really squished it into the cracks to bring out the contrast with the red.  It’s such an awesome technique that needs very little skill to achieve great results.

20140227-200147.jpg

I made some fat polka dots with Copper paint dabber – I love the metallic paint dabbers, the never seem to dry out and add so much interest to whatever you’re working on.  The pearl one is a favorite of mine!

20140227-200305.jpgI like to put a little extra in my swaps so I well and truly got stuck into the heart theme.  I think my swap partner appreciated it as she gave me a 5 (top rating) plus a heart, yay.

Do you part take in any art or craft swaps?


Atlas ~ Map Cards

13 Jun

A while ago when my SIL came to visit and get scrappy with me, I whipped up these quick cards made from pages of an old atlas.

DSC04632

I had heaps of this (very) bright blue cardstock that I wanted to use up and the atlas pages just seemed like a perfect match.  At first I just aged the patterned papers by scrunching, folding, edge distressing and ink distressing.  I thought I was done as I wanted fast and simple (aka quick and dirty?) but the longer they sat on my craft desk I just knew they weren’t quite finished.

So I combed through my stamps and rub-ons to add that certain something that was lacking.  I decided to still keep it simple and stick with 2 main colours of ink; red and black, which ties in nicely in the atlas paper.

DSC04659DSC04668DSC04663

Now I am totally in lurrrve with these cards, so much so it’s hard to pick a favorite.  From blah to brilliant, I love it when things work out!

I’m going to put these cards in the shop very shortly with some extras I haven’t shown here.

Archival Resist ~ technique tip

16 Apr

I did promise in my creative chemistry post that I would share a tip that I sort of stumbled across whilst trying the archival resist technique. The instructions for the technique says to use Archival Ink of which I only have the jet black as at the time of doing the class I couldn’t justify buying more ink pads when I already had so many from my Kaszazz days. Not knowing exactly what sort of inks I could substitute with, I grabbed the Ancient Page and Vivid ink pads out hoping they would be similar to the Ranger Archival Ink.

The technique calls for your brightest hues to be used as they need to stand out against the Distress Ink that goes over the top. (*Forgive me for not revealing the whole technique as I would be breaching class etiquette, as previously mentioned you can still purchase the class, and I can highly recommend it!) Okay, so I tried the Ancient Page in as bright a shade I could find but it didn’t really show up under/through the Distress Ink – alas it did not Resist! Next up was the Vivid ink – I’m not sure if you can still buy this ink or not?

20130412-175838.jpg

Wowee it worked a treat. As you can see in the previous post here and the photo below, the colours really pop.
IMG_1230

So for anyone out there with languishing Vivid ink pads you need to get onto this technique. I’m really happy as I was steeling myself for disappointment at not being able to try this technique but now I will be getting a lot of use out of my Vivid inks…..now, did I have any re-inkers for those pads hmmmmmm.
IMG_1229

Here’s a second alcohol ink agates tag just for fun. This was another of my new fave techniques.

Creative Chemistry Re-visit

12 Apr

I just had a look at my original creative chemistry post (which you can read here) and realised it’s been a year since I did that class!  Good gosh time just gets away from me.  The reason I was looking it up was because last weekend I had a lovely visit from my SIL and niece and we got up to some crafty fun.  I decided to drag out my CC folder and actually start finishing the rest of the tags – I’d only done the first two…whoops.  Anyway it was soooooo much fun, I experimented with new techniques, finally tried out the alcohol inks I’d bought and it was nice to be doing craft for me instead of trying to come up with ideas for the online store.

I got through six tags in one sitting so you could say I am more than a little chuffed with myself.  You can still enrol in the Tim Holtz Creative Chemistry class at online card classes; it’s just not in “real time”, but you do get lifetime access which is great as you can go back and re-watch the video for any techniques you’ve forgotten how to do.

Here’s all the tags so far; remember the first two were done over a year ago hee hee.

IMG_1221

This one is blended spritz and flick.  I love the soft background; it looks like it would feel fuzzy to the touch.

IMG_1222

Brushless watercolour – I’ve actually been using this technique a lot, it’s simply stunning.

IMG_1223

I actually did this technique last year too but wasn’t really happy with the resulting look, I think the colours got too muddied so on the weekend I re-did the tag using just 4 colours that blend well to make wrinkle free distress.

IMG_1224

Okay this is one of my favorites, alcohol ink agates.  This was the first time I’d used the alcohol inks and I was a little scared, I’ll admit it!  Let’s just say I am now a big fan of these bright, brilliant hued inks.

IMG_1225

You know it is hard to narrow down those favorites, I mean check this one out; archival resist.  I have a little tip with this one that I’ll post later with some extra tags I made when I was playing around with these techniques.

IMG_1226

Reflections stamping uses an embossing folder with a white space area – I only had this cute Halloween folder that came close but I like how it turned out.

IMG_1227

This technique is one I want to work on as I can see the fantastic potential, I just need to hone my skills in this area; water colouring with re-inkers.

IMG_1228

Not exactly the same result as Tim but a pretty cool look in itself anyway.  This is layered misting.

So what do you think?  Can you pick a favorite, it’s hard right?  I’m wanting to keep up the momentum with these techniques and finish the class, so keep an eye out for more of these tags, coming soon.

recent kaszazz projects

13 Aug

A little while ago I spent a lovely weekend with fellow consultants at my team managers house eating, drinking, laughing and crafting.  It was a wonderful time even though I got the dates mixed up and almost missed the whole thing!

Some of us had organised to work on the same projects so we could share tools and materials.  I was thrilled that I completed four Kaszazz workshops over the Saturday and Sunday.  And I was able to keep up with Dee which is a miracle in itself hee hee.

Here are the projects I did, they are all Kaszazz workshops so if you’d like to register your interest please drop me a line.

This one uses Distress Embossing Powder.  I love the simple design and the flower colours.

These By The Sea cards use shrinky dinks and ink blending.  It was a bit difficult to get the blending right but by the end I really got the hang of it.  The seahorse is a little dark for my liking but I can live with it!

Sorry for the crooked photo!  I just love this layout.  The stamped sections shimmer with perfect pearls and the dragonflies are glittered.  So pretty.

These rocky candy crackle paint cards were a bit laborious to make but they look amazing.  I’m in love with the embossing on vellum and scallop punch flowers.  Oh and the colours!

I loved making every one of these workshops as they all used new and different techniques and tools.  I can’t wait to apply what I learned to some of my own creations.

Happy scrappin’

Kris

Kaszazz Workshops ~ July 2010

30 Jun


JULY WORKSHOPS

Fri 16th at 2pm ~ 2H495 1 Sheet Box and Cards $25 per person

Make a gorgeous set of five cards and storage box using stamps, Distress Ink and ribbon.  Choose your own colour scheme.  Learn how to make the most of your supplies.  Suitable for beginners.  BYO Basic Tool Kit and save $2.50!

Sat 17th at 1pm ~ FREE Craft Catch Up Afternoon

Need some inspiration?  Join other paper crafters and get those long forgotten projects done.  BYO projects and tools.

Mon 26th at 2pm ~ 2H409 Daisy Design Adhesive Cards $25 per person

Learn how to use the new Design Adhesives with clear sheets in this fun class.  Includes stamping, Paint Dabbers and Perfect Pearls.  Suitable for all levels. BYO Basic Tool Kit and save $2.50!

Refreshments provided at all events.

Bookings are essential, email krismarr(at)iprimus(dot)com(dot)au.

Open House ~ Fun times had by all!

7 Feb

I apologize for this post being so late – it’s like I just can’t keep real life and blog life matching time-wise.

Therese C. from Numurkah won the Mega Prize of over $200 worth of scrapbooking goodies.   She was rather chuffed and excited when I let her know.

The Open House and Free Make and Take was a blast, I think it’s safe to say everyone had a great time learning about the new products, sipping champas, muching on cupcakes and winning lots of prizes.  Thanks ladies for sharing the fun!  Unfortunately I was too busy enjoying myself to remember to take photos – next time I will delegate that job to someone.  I do have some to share of the projects though…the first two are my designs..what do you think?

This is one of my favorites.  I’ve used Smooch Sugarberry on the flower which happens to co-ordinate perfectly with our purple fabric flowers and funky card base.  The black and white polka dot paper is the B-side of one of our new Romance papers.

Can you guess who loves polka dots?  I just can’t help myself when it comes to this pattern!  I’ve used gold embossing on this card and highlighted with red Siren Smooch.  The dots are also a B-side, from our Merry Christmas range.  I love how most of the B-sides in Kaszazz’s paper ranges are non themed because you get so much more use out of them.

This was the project that everyone got to make – in various colours as it uses card from the funky pack.  We actually made these at NTTD and everyone was so impressed by how fantastic they look for so little effort.  Well ditto at my open house and this particular Design Adhesive – Daisy Daze was an absolute hit!  (and BTW I have the matching rollergraph wheel too hee hee).  I am also loving the new Top Boss glitters that we have, I think they are the most sparkly glitters I have ever seen or used.

Now these tags were just some playing around I did to show some of the ladies how to use rub ons, distress ink, the ink blending tool and distress embossing powder.  The tag on the right I had made before the day and it was the inspiration for the gift tags featured below.  I think I still need to do a lot more experimenting with the distress ep as I’m just not sure if I’ve got it right yet.

Now these little beauties I made to attach to the free gift that everyone received on the day.  Can I tell you how much I love them?  A WHOLE LOT!  When I started making them it was one of those “don’t know if this will work but here goes” moments.  I made them all together doing each step like an assembly line, I just kept thinking, if it doesn’t look right I’ll just keep blending and stamping until it does.  Now we all know that sometimes that can end in disaster but luckily I didn’t need to go down that track as these just came together like a charm.  I decided to use curling ribbon instead of fabric ribbon as I wanted to tie it right around the gifts like little parcels.  I think the purple gives it a bit of oomph.  And did you notice that gorgeous chandelier stamp – I have been hanging out for one for a very long time, I almost bought a non Kaszazz one but I’m still sticking to my guns about not buying more stuff until I use what I’ve got.

That about wraps it up peeps.  So what do you think of my creations?  Are you into ripping and distressing and inking all over your projects or do you prefer the clean, streamlined look?  Leave me a comment as I’d love to know if you’re embracing this current “distressing” trend or not.

Don’t forget that I will be hosting an Open House & Free Make and Take after each new product release from Kaszazz so be sure to check back here for the next dates in May and September.

I’ve got photos to share of our Kaszazz national team training day (NTTD) and I am determined to post them in the next few days so be sure to come on back!

Til next time

Kris

Embossed Christmas Cards

30 Oct

Well boys and girls it’s not too early to start making your Christmas cards!  I’ve been having a little play with some simple designs that I can whip up bulk style to cover all the card sending needs this Christmas.  Ahem not like last year when I didn’t make any…I know it’s unbeleivable isn’t it?  These three cards are all embossed and I’ve used distress inks on the base card with our new swirl stamp which is becoming a sure favorite.

verdigris-design-adhesive-x

This first card I’ve used Verdigris embossing powder on the design adhesives (yes you can use them that way too – they are amazing).  The colours of the card is all wrong so I need to use the verdigris on something else but it is a beautiful finish, it’s a bit hard to see in the photo but the powder has greens and golds in it which melt together to give a lovely pattina.

xmas-cards1

These two are just embossed with the gold ep.  They look quite pretty for a quick and simple card.  I think I’m onto a winner with these two.  So will you be making your own cards to send out this Christmas?  Do you even send cards?  I love receiving mail, it can really brighten your day so now I’ll take any excuse or holiday to post something out!

Happy Holidays (almost)

Kris

Mint Julep rival and school theme scrapping

23 Sep

Hello dear friends

I thought I’d better do a little update in case you were wondering where the heck I disapeared to hee hee!  I’ve mostly just been buzzing around doing a bit of this and a bit of that but with nothing really major to report at this point!

I did make my own cordial which was the best tasting cordial second only to this lovely tipple0mintjulep

And it was so easy that I have vowed to never buy shop cordial again!  I’m going to try and imitate the mint julep because the taste is just amazing.  I got the recipe from recipezaar and just halved it as one commenter suggested.

cordial

Isn’t it the most divine colour?  And talk about fresh – you could almost drink it straight!  Apart from buying the tartaric and citric acids (easy to find in the baking section of supermarket) you may well have all you need already at home.  Do try this if you’re a cordial drinker, you won’t be disapointed.  Next on the to-do list will be a berry cordial, yummo!  If anyone else has been making their own cordials I’d love to hear about it – leave a comment below!

In the foodie arena I also made Swiss Bircher Muesli which turns out to be one of the best breakkie’s ever.  So zingy and fresh; I’m eating it almost every morning now.  Is anyone else a fan of the bircher?  And my daily fruit intake has gone from zero to 2+ which is surely commendable?  Woo hoo for a healthy life style.  Now if I can just keep up the dvd workouts I’ll be happy lol.

Craft wise things have been a little slower.  I did purchase two sewing project kits; a little monkey softie and a cushion thingie.  They are complete kits though with fabric, cotton, instructions etc so I should be able to manage them ok.  And they came in the most adorable little cases – don’t you think?

monkey

I finally got to make and teach this workshop by Naomi Elliot.  Love these cards so much especially as they are easy as pie to whip up.  They use the distress inks and ink blending tool.

flourish-blended-2H

I’ve been working on a few workshop submissions but haven’t really had enough time to sit down and really get stuck into them.  Also my blog war challenges have fallen by the wayside – will try to rectify this shortly.  Here’s a couple of things I’ve squeezed in lately.

rustic-card-5PQ

waterfall2a

waterfall2b

I have been enjoying training and spending time creating with my new recruit Lynda.  It’s so much fun to have someone to play with.  We are going to start a regular get together with my upline Deanne to make up more workshop samples.  Crafting is great when you can combine it with a coffee and a chat!

I had a good clean of the house on the weekend, sort of a lead up to the big SPRING CLEAN that needs to be done.  And James has headed back into the garden now we have a brand spanking new whipper snipper, so the yard is starting to look normal once again.  The nicer weather really helps spur you on especially seeing all the spring blossoms.  Have you been out in the garden lately?  What have you been planting, flowers, veggies?  I’d love to know.

So that’s a fair round up what I’ve been doing instead of blogging he hee!  I will endeavor to not leave it so long between posts this time.

Cheerio

Kris

PS Kaszazz have had a new release of gorgeous products including school theme papers and stamps, plus distress embossing powder, new smooch colours and more design adhesives!  Check them all out on line here (click on SEP 09) or email me to organise a new flyer sent straight to your door for just $2.00 (AUS ONLY) krismarr(at)iprimus(dot)com(dot)au

Here’s some pics of two workshops from National Training using the new products…

school-2Hb

school-2Ha

shopaholic-2H